3.9 KiB
Create Letsencrypt Issuers and Ingress Services
Copy the configuration templates and change the file according to your needs.
# in folder deployment/digital-ocean/https/
cp templates/issuer.template.yaml ./issuer.yaml
cp templates/ingress.template.yaml ./ingress.yaml
At least, change email addresses in issuer.yaml. For sure you also want
to change the domain name in ingress.yaml.
Once you are done, apply the configuration:
# in folder deployment/digital-ocean/https/
$ kubectl apply -f .
{% hint style="info" %} CAUTION: It seems that the behaviour of DigitalOcean has changed and the load balancer is not created automatically anymore. And to create a load balancer costs money. Please refine the following documentation if required. {% endhint %}
{% tabs %} {% tab title="Without Load Balancer" %}
A solution without a load balance you can find here.
{% endtab %} {% tab title="With DigitalOcean Load Balancer" %}
{% hint style="info" %} CAUTION: It seems that the behaviour of DigitalOcean has changed and the load balancer is not created automatically anymore. Please refine the following documentation if required. {% endhint %}
In earlier days by now, your cluster should have a load balancer assigned with an external IP address. On DigitalOcean, this is how it should look like:
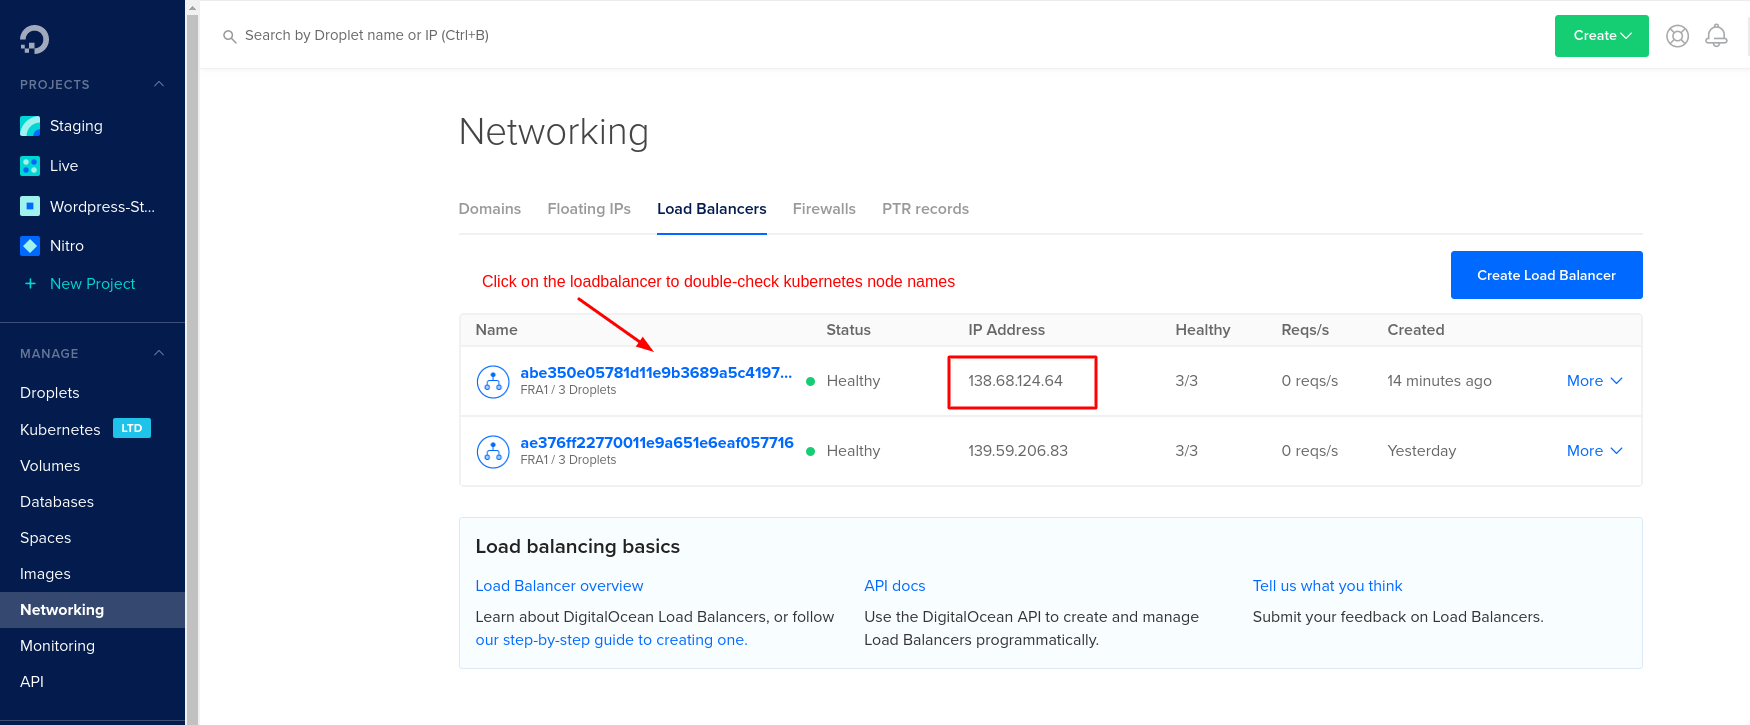
If the load balancer isn't created automatically you have to create it your self on DigitalOcean under Networks.
In case you don't need a DigitalOcean load balancer (which costs money by the way) have a look in the tab Without Load Balancer.
{% endtab %} {% endtabs %}
Check the ingress server is working correctly:
$ curl -kivL -H 'Host: <DOMAIN_NAME>' 'https://<IP_ADDRESS>'
<page HTML>
If the response looks good, configure your domain registrar for the new IP address and the domain.
Now let's get a valid HTTPS certificate. According to the tutorial above, check your tls certificate for staging:
$ kubectl -n ocelot-social describe certificate tls
<
...
Spec:
  ...
  Issuer Ref:
    Group:      cert-manager.io
    Kind:       ClusterIssuer
    Name:       letsencrypt-staging
...
Events:
  <no errors>
>
$ kubectl -n ocelot-social describe secret tls
<
...
Annotations:  ...
              cert-manager.io/issuer-kind: ClusterIssuer
              cert-manager.io/issuer-name: letsencrypt-staging
...
>
If everything looks good, update the cluster-issuer of your ingress. Change the annotation cert-manager.io/cluster-issuer from letsencrypt-staging (for testing by getting a dummy certificate – no blocking by letsencrypt, because of to many request cycles) to letsencrypt-prod (for production with a real certificate – possible blocking by letsencrypt for several days, because of to many request cycles) in your ingress configuration in ingress.yaml.
# in folder deployment/digital-ocean/https/
$ kubectl apply -f ingress.yaml
Take a minute and have a look if the certificate is now newly generated by letsencrypt-prod, the cluster-issuer for production:
$ kubectl -n ocelot-social describe certificate tls
<
...
Spec:
  ...
  Issuer Ref:
    Group:      cert-manager.io
    Kind:       ClusterIssuer
    Name:       letsencrypt-prod
...
Events:
  <no errors>
>
$ kubectl -n ocelot-social describe secret tls
<
...
Annotations:  ...
              cert-manager.io/issuer-kind: ClusterIssuer
              cert-manager.io/issuer-name: letsencrypt-prod
...
>
In case the certificate is not newly created delete the former secret to force a refresh:
$ kubectl -n ocelot-social delete secret tls
Now, HTTPS should be configured on your domain. Congrats!
For troubleshooting have a look at the cert-manager's Troubleshooting or Troubleshooting Issuing ACME Certificates.